I think sometime last month I came across these model horse feed bags printables on Last Alliance Studios blog. They were available in JPEG form, so I resized them in Word (I know, I should be doing it in Photoshop...but I don't have it on my computer, so it ends up involving other people). I did change it up a bit.
Like cutting off the bottom part that allows the bag to sit up-right. I made mine so that they were sewn at both ends like the chicken and goat feed we have out back.
The glued lip piece ended up being too small,
so I cut out pieces of white paper to make a better lip for everything to assemble better.
Of course, trimming the white paper is essential for clean edges...
...and placing the bags under something heavy to help adhere the paper pieces.
Now, that the glue is dry, the sides need to be folded to look like this. Modge Podge (white glue + water) the outside of the bag to one: seal the print, and two: mimic the shiny surface some feed bags have. Note: this part goes in two stages since you don't want to start over because one got glued to your workspace.
Once they were dry, I poked holes with a sewing needle in the bottom part of the bag. This would be sewn together in an odd "running" stitch were it makes a straight line without sewing a backstitch. I used carpet thread because it's stronger than all-purpose thread.
I might have to do a separate post on how to sew this way. There is no name I know of for this stitch. I have been using this stitch for a long time.
Once all were stitched, add a thick layer of modge podge over the stitched area to secure the stitches, so that they won't come out.
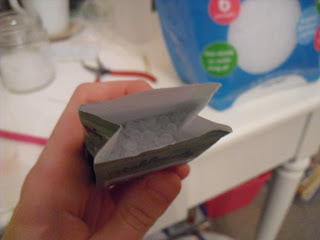
Now that the bottoms were finished drying, open up the bags like this. It helps with pouring in the beanie baby beans.
It took me awhile to figure out how to sew the easy-to-rip-open-the-feed-bag-loop-stitch. I had to think about it for a few days. Then when I was mapping it out on the protective paper I put on my desk to act as a placemat, I thought, "I should be able to figure this out - I draw Celtic knots - this shouldn't be as bad as I think it is!" Yes, I can draw Celtic knots.
I also cut out teeny tiny cardstock strips that is helps secure the opening stitch.
These I pre-poked the holes in after trying to poke the hole in the bag AND the strip...and tried think of a different avenue before digging them back out of the trash to attach to only the opening rather than both the top and the bottom (which is how they really are, I soon realized).
But before sewing up the opening, they need to be filled with the beanie baby beans to add some weight.
I poured some into a container for easy transferring (obviously the packaging is too big and heavy for something miniature).
They don't need to be filled to the top - only about 3/4 of the way, so that you could still sew the top.
Now the tricky part. Just when you think that drawing out this stitch is hard enough as it is - sewing it is even worse! But you get the hang of it.
Yeah, I used a toothpick to hold the loop open without it undoing everything. Everything starts to stay in place around the middle.
Another view of how that loop works. You literally poke the needle through the bag, pass through the pre-poked strip, carefully thread through the previous loop, secure the loop through gentle pulling (hold onto the end when starting out - it WILL come out!), take the needle BACK through where you just came, and once the new loop is small enough, stick the toothpick through it, and secure the thread by carefully pulling on it.
Of course, my ADD kicked in with the camera.
To anyone working with miniatures, "Use Alone" means "Oh, Look! Now I have Ice!"
Here is that stitch completed.
The second to the last step is to modge podge the top stitching just like the bottom. Then you can trim the extra thread to about 1/4 of an inch from the bag on each ends. If that makes sense. In other words, don't trim it down to the base or it would likely come out.
And there you have it, now you have feed bags for your models horsies!


No comments:
Post a Comment