Saturday, October 31, 2020

Candy Corn

 Last week, Lynn Isenbarger of Horsie Mama blog, posted about giving her horse candy corn as a treat - which was coined by I don't remember who Jennifer Buxton of Braymere Saddlery blog wrote about back in 2018. So, just like everyone else, I had tried both the dogs and the cats to see if they would eat the candy corn (of course, I forgot the goats and the chickens at the time). The dogs, in true form, ate them sometimes without chewing - figures! And the cats looked at me in disgust, "what are you giving me?"

Thank you Lynn for reminding me to try out giving the candy corn to the goats, chickens, and now the new pony!

I'm also tried out posting videos to the blog, because the video footage is better than trying to capture the responses than a still photo. However, no matter how short I made the video - it is still too big of a file to post. I'm not tech savvy enough to know how to fix it.

Oh, well.....I don't have any photos from that day (except for two), but I can show you other photos of each individual and tell you about their reactions.

Bonnie eventually warmed up to trying some. She's at the bottom of the pecking order, so if you are giving anybody attention or food, she gets shooed away by the others. However, that doesn't seem to mind her too much. I had to feed her some candy corn separately after distracting the others with their regular hay and corn. Bonnie was too busy eating her real corn to be bothered with some candy corn.
Lizzy is a picky eater. If it has someone else's spit on it (goat or human), she won't eat it. If it's not the usual treat, she won't eat it. It was probably both: something different and Chloe's spit was on my hand.
Paisley loved them! She is a foodie after all.
I tried giving some to Thunder and got the same result as before.
Sniff, sniff, I'm not eating that!
The chickens weren't impressed either.
Peck, peck, I don't get it, what are you giving me??
Jacks wasn't too hip on them either. I had dropped some into his feed bucket. He literally sniffed it and then looked up at me with the look of "What? What's this?"
Of course, he was distracted with Brody being there and started banging on his gate and fence. I seriously think Brody takes pure enjoyment in tantalizing Jackson with the fact of being closer to the food (the former pasture for the goats is now Brody's area, while the goats stay in their pens). Later, after feeding everyone, I treated Jacks with some animal crackers (goat love these!) Obviously, these were a better hit! He did eventually eat the candy corn when it got mixed in with his regular food. 
Brody absolutely loved them. He loved them so much that that was the reason why he was by Jacks begging for more when I was trying to get Jacks interested in them. What I did not know, was that the next few days, Brody was totally convinced that I had more in my pockets. He is a yearling after all and is still learning.
Chloe, another foodie, clearly loved them also, to the point of dominating the space so that she got ALL of them. I had to push her away a few times. She usually throws a tantrum by shaking her head and therefore her horns, as she tromps away.

One of these days, I might figure out how to post videos......maybe even revamp my YouTube account for easier posting.
We'll see.


Friday, October 30, 2020

Feed Bags

 I think sometime last month I came across these model horse feed bags printables on Last Alliance Studios blog. They were available in JPEG form, so I resized them in Word (I know, I should be doing it in Photoshop...but I don't have it on my computer, so it ends up involving other people). I did change it up a bit.

Like cutting off the bottom part that allows the bag to sit up-right. I made mine so that they were sewn at both ends like the chicken and goat feed we have out back.

The glued lip piece ended up being too small,

so I cut out pieces of white paper to make a better lip for everything to assemble better.
Of course, trimming the white paper is essential for clean edges...
...and placing the bags under something heavy to help adhere the paper pieces.
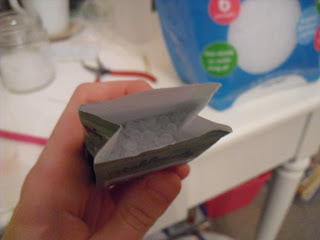
Now, that the glue is dry, the sides need to be folded to look like this. Modge Podge (white glue + water) the outside of the bag to one: seal the print, and two: mimic the shiny surface some feed bags have. Note: this part goes in two stages since you don't want to start over because one got glued to your workspace.

Once they were dry, I poked holes with a sewing needle in the bottom part of the bag. This would be sewn together in an odd "running" stitch were it makes a straight line without sewing a backstitch. I used carpet thread because it's stronger than all-purpose thread.
I might have to do a separate post on how to sew this way. There is no name I know of for this stitch. I have been using this stitch for a long time.
Once all were stitched, add a thick layer of modge podge over the stitched area to secure the stitches, so that they won't come out.
Now that the bottoms were finished drying, open up the bags like this. It helps with pouring in the beanie baby beans.
It took me awhile to figure out how to sew the easy-to-rip-open-the-feed-bag-loop-stitch. I had to think about it for a few days. Then when I was mapping it out on the protective paper I put on my desk to act as a placemat, I thought, "I should be able to figure this out - I draw Celtic knots - this shouldn't be as bad as I think it is!" Yes, I can draw Celtic knots.
I also cut out teeny tiny cardstock strips that is helps secure the opening stitch.
These I pre-poked the holes in after trying to poke the hole in the bag AND the strip...and tried think of a different avenue before digging them back out of the trash to attach to only the opening rather than both the top and the bottom (which is how they really are, I soon realized).
But before sewing up the opening, they need to be filled with the beanie baby beans to add some weight.
I poured some into a container for easy transferring (obviously the packaging is too big and heavy for something miniature).
They don't need to be filled to the top - only about 3/4 of the way, so that you could still sew the top.
Now the tricky part. Just when you think that drawing out this stitch is hard enough as it is - sewing it is even worse! But you get the hang of it.
Yeah, I used a toothpick to hold the loop open without it undoing everything. Everything starts to stay in place around the middle.
Another view of how that loop works. You literally poke the needle through the bag, pass through the pre-poked strip, carefully thread through the previous loop, secure the loop through gentle pulling (hold onto the end when starting out - it WILL come out!), take the needle BACK through where you just came, and once the new loop is small enough, stick the toothpick through it, and secure the thread by carefully pulling on it.
Of course, my ADD kicked in with the camera.
To anyone working with miniatures, "Use Alone" means "Oh, Look! Now I have Ice!"
Here is that stitch completed.
The second to the last step is to modge podge the top stitching just like the bottom. Then you can trim the extra thread to about 1/4 of an inch from the bag on each ends. If that makes sense. In other words, don't trim it down to the base or it would likely come out.

And there you have it, now you have feed bags for your models horsies!

Wednesday, October 28, 2020

Model Horsey Wishes

So, on Sunday was my birthday. It was kind of weird and laidback, taking in the fact that I am two years shy of thirty....very, very weird. Either way, it was still great! We had a small "party" with just my family and my grandparents from my mom's side. We had meatloaf, broccoli, and scallop potatoes for an early dinner (glad we had something really filling - by two younger brothers just took the boy scouts on an overnight backpacking trip and they ALWAYS come home extra hungry!) We usually do presents in-between dinner and cake to give our stomachs some time to settle. Then the cake was an Irish Apple Cake that we usually have for St. Patrick's Day, but I really like it because it's not overly sweet (that's one thing I have noticed as I got older was the ability to handle overly sweet cakes and frosting - considering having a sweet tooth - thankfully, ice cream is still somewhat ok). The recipe calls for a custard topping, but vanilla bean ice cream works just as well.

Horsey presents?

Yes, there were horsey presents...that is, model horsey presents.

Obviously, two of the main ones are in the photo above. Santiago, the Tractor Supply Company Breyer Special Edition Solidago, and Blue-Eyed Bandit, the Breyer 70th Anniversary Chase Piece, both joined my herd. Even though Santiago is on the cartoony Boomerang mold, I absolutely loved the Dunalino coloring. And, he is just way too cute to pass up! I am still researching what "breed" - haha - mustang type to have him as due to his stockiness. I can't wait until we could go to Bear Lake next (probably next summer) because his coloring would look awesome with the blue lake background! And now Blue-Eyed Bandit! Mold wise, he is obviously a Thoroughbred. Thankfully, there's a line of Framed Overo TBs in existence - look up the TB stallion, I Was Framed, he's pretty cool. So, I figured, "lets give him a racehorse name." I wanted something similar, but different, to I Was Framed. I can't remember what my first idea was, but Jack Sparrow was in the middle somewhere before I came up with his permanent name. Why a pirate or a bandit? Well, both of his eyes have black patches over them....hence, eye patches....which is where the connection with I Was Framed began. Blue Eyes? Yes, he has striking blue eyes. A keen characteristic, indeed!

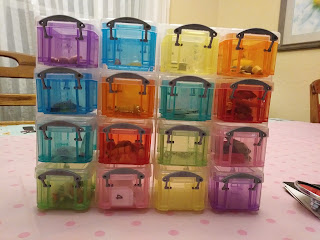
I had been keeping my eye on this organizational plastic box set for a long time. My previous problem was that I didn't have a use for them until now.
Model Horse props!
And you think that my current collection is small? Well, it was overflowing in the two "boxes" I had them in. Now, there is enough space for growth!
My grandparents' dogs (no, I'm not kidding - it's something fun to do) gave me a unicorn printed plastic box to help with organizing my projects and/or supplies. I didn't know what to use it for until yesterday, while cleaning my room (which was a catastrophe - it's mostly clean now...minus the multitudes of projects that need finishing!). So, you see the blue lid box in the background? Well, it had been overflowing with my supply of ribbons for well over a year. I have all the different sizes sectioned out into sandwich baggies for easier navigating. Problem. It all doesn't fit in the box. So, when I was putting some scrap ribbon away, and once again having to deal with some overstuffed Ziploc falling off of the pile coming out of the box, I thought of my new one and tried it out. All the baggies fit into the new box and the rest of the miscellaneous ribbons can stay in the old one. Problem Solved!
The other, non-model horsey things I was gifted was a weighted blanket to help with my heated blanket (I am always cold and needs tons of layers to keep warm) and some gear for my bike....that is, trike, tricycle, three-wheeler (my preference)...my balance can be a bit challenging somedays and the ability to ride a regular bike ended up not being an option. I'll write another post about that later after my little (big) brother and I get my three-wheeler all decked out with the new gadgets!

Thursday, October 15, 2020

MEPSA OF Plastic Regular Qualifier Results

 I know....another photo show results post....

I am totally procrastinating on all of the other important stuff I need to get done (like my ICEE project!!!)

My photos for this show are coming, but the emailed results came earlier this week.

I still am waiting on the Performance Clinic Special's results. I really want to know how I could improve my performance pictures.

Anyways, enjoy!

I finally am close to having a good photo of Carlotta Emma!!! Yeah...it may looks OK on the computer screen, but it prints kind of dark. Ugh! Either way, this photo did a lot better than her last one.
Gender Division: Pony Mare: 9th place
Breed: British/Irish Pony: 6th place
Color: Black: 3rd place (qualifies for the champ show!)
Collectability: Breyer TR Current Lineup: 6th place
Ballynoe Castle RM (Ballynoe for short) placed in the top 10, heat B in his class for the Color Division: Bay/Brown: 9th. (I need to re-do his picture - he's head isn't in focus that well).
This photo of Brighid printed dark - but I already have plans for new photos! She did pretty good for her first MEPSA show.
Gender: Pony Mare: 3rd (another qualifier! Now work on getting a better photo!)
Collectbility: Breyer TR SR Events: 8th place
Kyla's head study placed 4th.
This was one of those "Oh, I wonder" moments. I thought, "everyone photographs Misty from the other side with the spot over her eye. Why not try the other side?" It's new. It's interesting. And so far, the ones from this photo shoot's showing well.
Breed; North American Pony: 10th place
I had almost missed Cascade when weeding through the results deciphering my name code from someone else's whose code is nowhere similar to mine! (When taking this photo, I found that she looks better rearing).
Color: Fantasy/Decorator: 8th place
Ponderosa was another one I almost missed. Maybe a little bit on the bright side, but a hair darker is too dark for her.
Collectability: Breyer TR Recent Vintage: 5th place
As you could probably tell, everybody here except for Carlotta Emma, Mato Ska, Ballynoe, and Brighid, are from the same photo shoot. A cloud came over when trying to get a decent photo of a nearly white Fantasia without looking bleached.
Breed: Old World Spanish: 9th place
Color: Grey - Other: Honorable Mention
The actual photograph was cropped in Shutterfly (other than I couldn't remember which folder I have a digital cropped photo of Mato Ska.
Gender: Draft/Pony/Heavy Carriage/Other Foal: 8th place
Breed: Feral/Semi Feral: 3rd place (another qualifier!)


Tuesday, October 13, 2020

Silver Star Model Horse Photo Show Sept. Results

 The rest of the results finally came in. I'm assuming that the judge was super busy, so everything was two classes a day (roughly). I was thinking of not writing a post on the results, but then I noticed at the end of the previous post I had said that I would post the results sometime that week. Oh, well, here it is anyway.

This month's theme was Color.

Lionheart placed 3rd in Appaloosa Patterns.
Isabella placed 3rd in the Black coloring class.
Kyla is really a Grey foal coat with goggles (grey hairs around the eyes) and a grey muzzle. However, I am still uncertain as to WHERE to enter her when it comes to the Color Divisions. So, for this show, I entered her in her base color class: Chestnut. She placed 3rd.
Feldspar placed 3rd in the Dun/Dunskin/Grullo(a) class.

WOW! Four 3rd places. Had to count them, because I thought I was sounding like a broken record with all of those 3rd places. I didn't make any of this up either.

Fantasia placed 1st in Grey.
Numinor placed 1st in Other Color. (This class was very open-ended. I didn't know if it was for Fantasy, Decorator, or other natural colors that didn't have a proper class. Most ended up being the unrealistic colors).
Encore placed 2nd in Palomino.
Ezio Trot de Favacho placed 6th in Pinto patterns.
Wasaka placed 4th in the Roan class.