Friday, January 31, 2020

Pickles

Yes, I'm in a bit of a pickle.
It has taken a lot of mental energy to figure out what is wrong and how to fix it.
Apparently, the picture on the box is correct.

The model is not.


 This is how the spleen actually fits while under the diaphragm (the spleen is that triangular shaped piece that's supposed to attach to the two magnets on the stomach. The picture above is how the stomach actually sits when attached to the liver and the diaphragm). 
But that's not the main problem.

The skeleton is.
Oddly enough, the legs were very straight - which is not anatomically correct.
After figuring out the problem with the legs, I ended up threading the leg bones together with a double strand of wire and glued the joints together. After the glue was dry, I added Apoxie for better support. That was on Wednesday.
Yesterday, I went over to my grandparents house because I needed help from my grandfather with figuring out how to get the ribcage to stay on. It took most of the afternoon to find a solution, but we did find one.
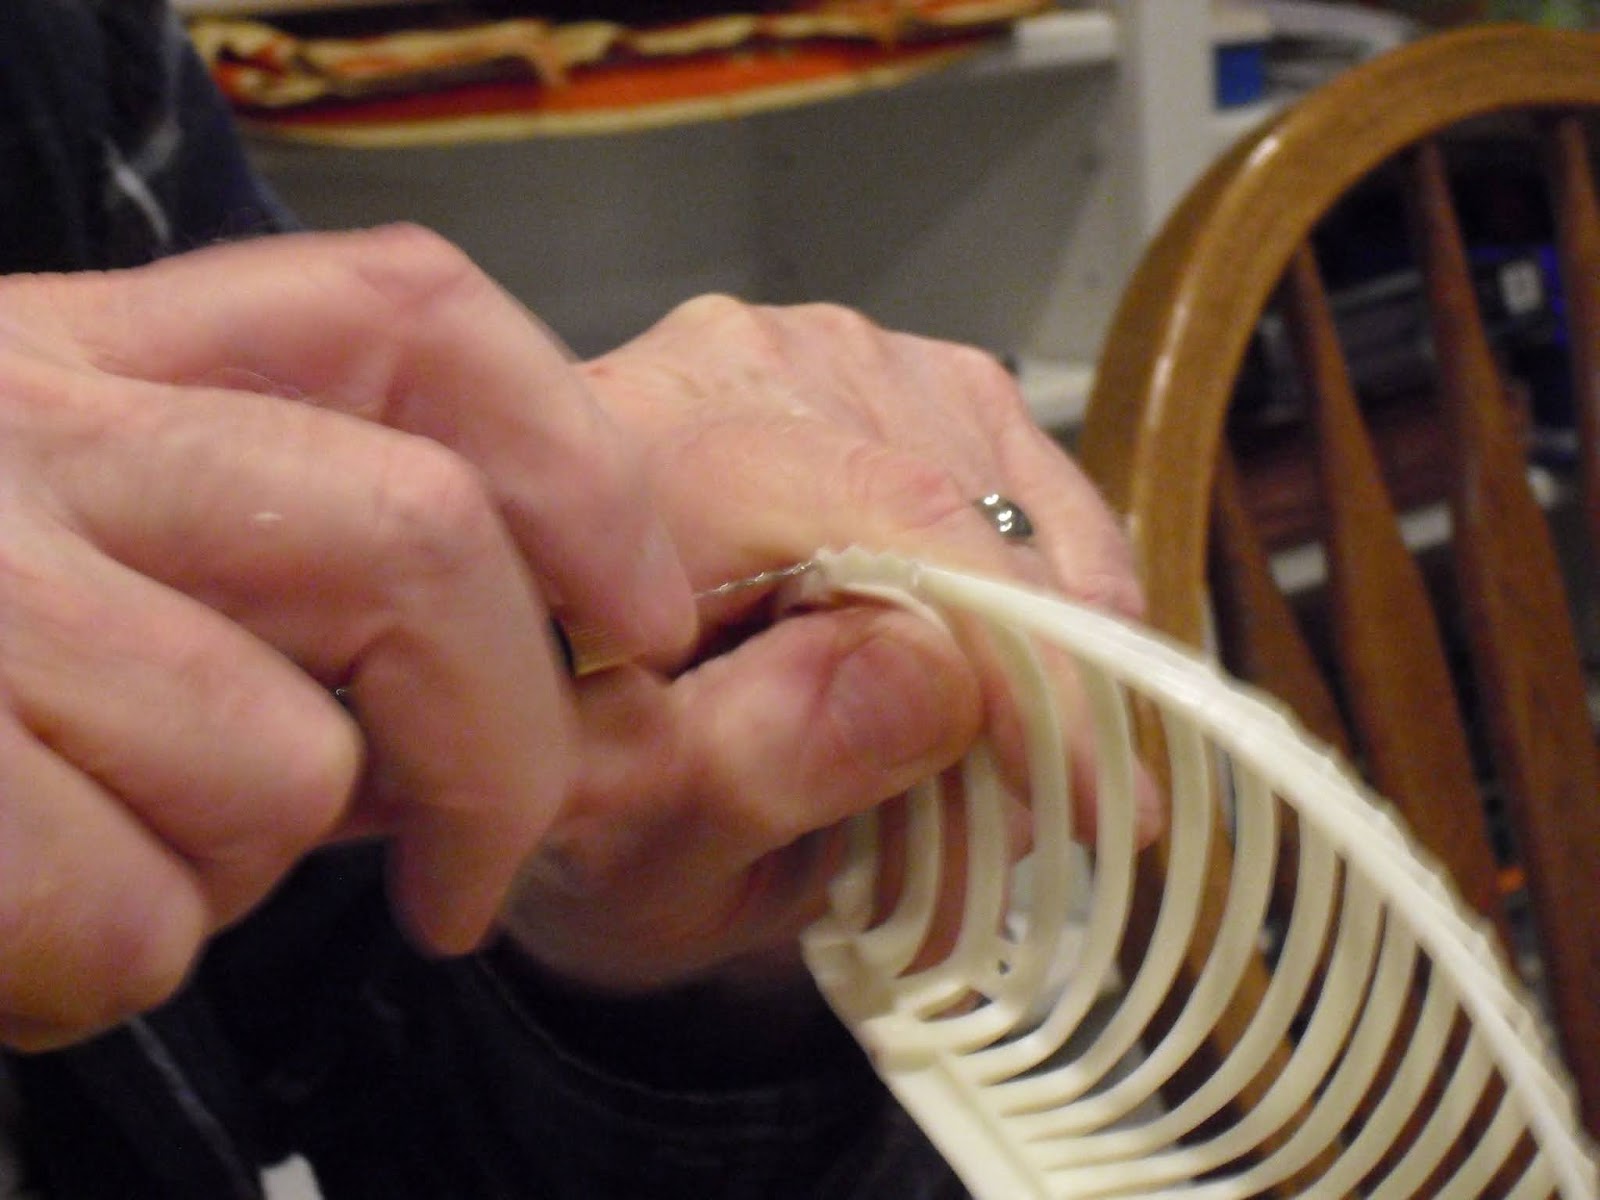
It involved drilling with tiny hand drills, filing with tiny files......everything on a tiny level. (My grandfather builds model airplanes and trucks, so he has ALL the right tools for this kind of stuff!!)
 Success didn't last long though. I had set this last night...and it doesn't match with the clear case.
 And this piece didn't fix either. This morning that rib broke off!
 I am trying not to get discouraged. It is a frustrating project - and NOT one to do in crunch time! I am still going to go back to my grandparents house this afternoon to primer the rest of the pieces, so that I could at least start painting those for starters. I just hope I get the skeleton fixed and painted by the end of NaMoPaiMo.

NaMoPaiMo Starts Tomorrow!

And I'm not ready.
It's not much of procrastinating, but of doing something that isn't quite working as well as you want it to be.
As usual, I wanted to do something different. But it also was a project that really needs to be done.
So, this is my 2020 NaMoPaiMo horse:
 I had gotten it for I think maybe Christmas - about 5 years ago now. I had glued most of the pieces together then. However, since I was still attending Utah State University at the time, I couldn't work on the kit as much. It wasn't until last year when I finally figured out what I was going to do with it. My original thought was to have it done for NaMoPaiMo last year, but that didn't happen. So, this year I decided that I should really finish it!

 It started with filling in seams that didn't meet in the gluing process. As well as, prepping other weird seams in other places.

 Then it was estimating out how everything went together to see where it needs improvement....like EVERYWHERE!!!
 I had decided to use tiny Earth Magnets, as what I have seen other model horse artists use, in place of the peg/hole method; since they didn't work properly.
 I had also added texture to the tongue, since it had none; and the throat was just flat.
 One piece of advice I would give to others who are wanting to do this kit: Is to set the magnets BEFORE putting the pieces together! It would save time on worrying that you are going to lose the magnets on the inside of the organ pieces. I did not have the magnet idea when I first got it. So, I have to use expanding foam.
 ...And make sure that there's a hole big enough for the wand to fit into.
 Ewww!
 Unfortunately, whenever the dogs see any kind of can that sprays something - they think it's a can of whip cream. So, we had to fence them out of the kitchen until the foam was dry enough to handle. Jasper barked the whole time.
 Here are the magnets.
Pretty tiny, eh? Those little dots are on the different magnets that are going to be on the matching piece.

What happened next deserves a post of its own.

Friday, January 17, 2020

MEPSA OF China/AR/CM Regular Qualifier Dec. 2019

Well, my lighting is getting better....but....getting those Stablemates and Mini Whinnies in focus is the next challenge. 
I only own one horse that would count as a China (I think). The rest of my entries are Custom Breyers.
 Topaz: Headstudy: 2nd Place
 Merida: Workmanship: Drastic: 6th
 Flora: Color: Fantasy: 6th
 Realta: Color: Fantasy: 7th
Ocean Mist: Gender: Draft Mare: 9th.
Breed: Clydesdale/Shire: 8th
 This is Samayo. He is my only Ceramic horse. I have him as a Paint x Taishu (Japanese breed) cross, because he is actually a 1960's Japanese ceramic horse sculpture; though, the Taishu breed does not have the Pinto gene - indicating a cross to inherit such a pattern. As far as the style of the Pinto Pattern, it is quite similar to those of Breyer Horses and Hartland Horses of the same era. I entered him in the OF China Division and he placed 7th in the Breed division: Other Mixed/Grade.

Sonya is Finally Finished!

Talk about finally! Sonya was my first Custom Wind Dancer. That is, excluding the several "Wind Dancer" Mini Whinnies I have done in the past, she is the first actual Breyer Wind Dancer scale custom I have done. She certainly turned out beautiful! Enjoy!


Here she is without her wings.

And her wings separately.
Facing the sunset, facing a new adventure.

Thursday, January 9, 2020

Curling Doll Hair....That is, Doll Horse Hair

I knew I wanted to do something creative with her hair, but how do you exactly go about that with synthetic doll hair? This website has a pretty easy step-by-step tutorial on how to curl doll hair. Of course, they used an old My Little Pony, so they didn't have to worry about ruining a custom finish with soapy, warm water. So, I wrapped Sonya up like a mummy with Saran wrap.
The first step is making a conditioner for the hair, which uses fabric softener (unfortunately, the container doesn't come in a small, squirt of a bottle). Then you need to soak as much of the hair in it as possible.
Then curl it! I had to go hunting for some plastic straws. I remember that my mom had a gallon size Ziploc bag stuffed to the gills of cut plastic straws for crafts, but I think we got rid of them when we moved. Thankfully, I found another bag of straws. The bobby pins were borrowed from my little sister - in other words, I should probably get my own if I intend on curling more doll hair any time soon. I also cut the straws pieces lengthwise to create a starting place like real curlers.
And then rinsed in clean water.
Repeat process with the tail and then set it on a towel to dry.

Wing Problems

I realized that I hadn't made any more progress posts on Sonya - especially since I finished her in November! So, sorry for the tardiness.

Since Wind Dancers have special mechanics for wing movement to satisfy the purpose of a winged animal for little girls. However, the mechanics doesn't fit in the shoulder area - the proper placement for wings. Instead, they are placed in the back. I had removed those mechanics and drilled holes in the upper shoulders for a pair of wire framed wings.
This is the first style for a wire frame I came up with. I was originally going to take teardrop shaped pieces of Tulle fabric and sandwich the wire in-between the pieces. However, due to the fact that the pieces of Tulle were a bit crumbled - it wouldn't stick to each other or the wire. Though, this process does work on a Mini Whinnie scale....just not anything bigger than that (I haven't tried this design on a Stablemate yet).
The two bottom pieces were originally designed to "hide" the hole, but I ended up cutting them off later since one set was shorter than the other. The end result looks better without them.
I got a little discouraged with the Tulle fabric idea. In turn, I searched Pinterest for alternatives. I ended up finding several ideas. One in particular was using Liquid Polymer Clay with Alcohol Inks.

Beautiful when not baked...just like with paint, once baked the colors darken, become more transparent, and the white becomes clear. That wasn't the main problem, though. The Liquid Polymer Clay has a terrible chemical aroma that WILL stink up the house!!! The other problem was that the wire piece that inserts into the horse - one of the pairs broke off and one of them (I don't remember which) the wire started to tear out of the "clay."
 Time for take two!......Just not in the kitchen oven. This time with a more detailed frame that might stick to the clay better. My family suggested that I use the little convection oven out in the garage (we use it for summer, since it is roasting enough inside due to old house air conditioning methods: Fans).
I had run some tests to find the right temperature/time alterations when using a convection oven....but even with the next set - it still was too much.
I don't remember what I was going to do with this set. I had apparently dashed the idea of using these, since my little sister commented that they look like bumblebee wings (which is fine) and that Pegasus' wings aren't vertical, but horizontal to the body (that's not good).
I had eventually returned to this set with a new plan: cellophane gift wrap plus glitter! It was another idea from Pinterest, but it is definitely a keeper! You can find the directions here. I pretty much followed them exactly - with the edition of glitter. Everything is better with glitter!
One set still ended up being a little bigger than the other. Oh well, it adds to the magic.
This part requires a steady hand and perhaps good eyesight. I had trouble seeing what I was doing, because the cellophane is supposed to shrink back to encase the wire frame...but sometimes I did too much and it exposed the wire a little bit.


To add texture, I wrapped the wings with the Tulle fabric - especially around the frame.
There are three metallic colors used: light blue, silver, and a yellow gold. This brought out the colors in Sonya's "necklace" and crown. And of course! More Glitter on top!!! Only one last thing to finish - Hair!