Showing posts with label Tutorials. Show all posts

Tuesday, January 18, 2022

How to Sculpt an Ear with a Breathing Hole

Shadow's extremely large breathing hole in her left nostril.

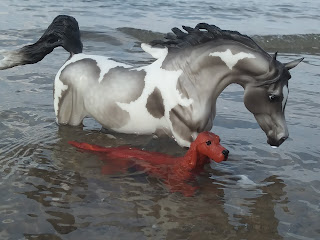
Typically, when customizing, artists will fill in the factory breathing hole that's located in the nostrils or the corner of the mouth and drill a small hole in the groin where it would be properly hidden. However, I like to place my models (OF and CMs alike) in water when I'm doing photo shoots at either a lake or a river.

Strider - CL CM


Which means...

Partly Cloudy & Emerald Isle - TR OF

the water level...

Drizzle - TR OF - Look at that Splash!

…can get pretty high.

So, having a hole in the groin makes me uncomfortable when envisioning the water level rising up through the hole and getting locked inside the hollow model - therefore, causing molding. 

That's when I started brainstorming on how to place a hidden hole in the ear. It actually didn't take me that long to figure it out, it was more of trying it out to see if it would work is why it took me so long.


Supplies:

Metal Needle Sculpting Tool
Cone Shape Silicone Blending Tool (these are used for oil paints)
Old Paint Brush for applying the Rubbing Alcohol
Two-Part Sculpting Material (Aves Apoxie or Magic Sculpt)
Rubbing Alcohol
Dremel w/ Diamond Bit Drill


First thing you need to do is drill a hole that's big enough to "find" during sculpting. Make sure it's in the correct location for the ear.

EDIT! Also have a larger hole in the belly or the groin, so that you can empty out any dried Apoxie that have accidentally broken off inside while sculpting. (Thankfully, the hole that I had already sculpted over has a layer of masking tape with the sticky side pointed inward to catch any little stuff that had dislodged over time).


It helps to sculpt one ear and let it cure before sculpting the other one. This enables you to not accidentally smash one ear while sculpting the other.


Once one ear is cured (this one is not one with a hole in it, by the way), carefully shape the  second one to be similar shape and size.


When folding the ear, keep it more open and poke the metal needle tool through what would be the ear canal.

Of course, I'm sculpting an ear that is pointed backwards! But, I'm sure this technique would work no matter which way the ear is pointed.

Carefully place the ear over the hole and mold it to the desired position.


Take the needle tool again and gently press the Apoxie to the sides of the hole.


Now, you need a small snake (a little longer than this piece) for the muscle around the ear.


And smooth it to the head and ear (use the silicone tool for blending to the ear). This helps prop up the ears - otherwise, they would lay over on the head funny and not look natural.


Now saturate the inside of the ear and smooth (and texture) it with the silicone tool. Also, continue to smooth out or texture the base of the ear to the head.
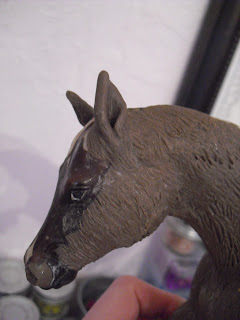


Congratulations! You have now made an ear with a breathing hole in it!!

Friday, October 30, 2020

Feed Bags

 I think sometime last month I came across these model horse feed bags printables on Last Alliance Studios blog. They were available in JPEG form, so I resized them in Word (I know, I should be doing it in Photoshop...but I don't have it on my computer, so it ends up involving other people). I did change it up a bit.

Like cutting off the bottom part that allows the bag to sit up-right. I made mine so that they were sewn at both ends like the chicken and goat feed we have out back.

The glued lip piece ended up being too small,

so I cut out pieces of white paper to make a better lip for everything to assemble better.
Of course, trimming the white paper is essential for clean edges...
...and placing the bags under something heavy to help adhere the paper pieces.
Now, that the glue is dry, the sides need to be folded to look like this. Modge Podge (white glue + water) the outside of the bag to one: seal the print, and two: mimic the shiny surface some feed bags have. Note: this part goes in two stages since you don't want to start over because one got glued to your workspace.

Once they were dry, I poked holes with a sewing needle in the bottom part of the bag. This would be sewn together in an odd "running" stitch were it makes a straight line without sewing a backstitch. I used carpet thread because it's stronger than all-purpose thread.
I might have to do a separate post on how to sew this way. There is no name I know of for this stitch. I have been using this stitch for a long time.
Once all were stitched, add a thick layer of modge podge over the stitched area to secure the stitches, so that they won't come out.
Now that the bottoms were finished drying, open up the bags like this. It helps with pouring in the beanie baby beans.
It took me awhile to figure out how to sew the easy-to-rip-open-the-feed-bag-loop-stitch. I had to think about it for a few days. Then when I was mapping it out on the protective paper I put on my desk to act as a placemat, I thought, "I should be able to figure this out - I draw Celtic knots - this shouldn't be as bad as I think it is!" Yes, I can draw Celtic knots.
I also cut out teeny tiny cardstock strips that is helps secure the opening stitch.
These I pre-poked the holes in after trying to poke the hole in the bag AND the strip...and tried think of a different avenue before digging them back out of the trash to attach to only the opening rather than both the top and the bottom (which is how they really are, I soon realized).
But before sewing up the opening, they need to be filled with the beanie baby beans to add some weight.
I poured some into a container for easy transferring (obviously the packaging is too big and heavy for something miniature).
They don't need to be filled to the top - only about 3/4 of the way, so that you could still sew the top.
Now the tricky part. Just when you think that drawing out this stitch is hard enough as it is - sewing it is even worse! But you get the hang of it.
Yeah, I used a toothpick to hold the loop open without it undoing everything. Everything starts to stay in place around the middle.
Another view of how that loop works. You literally poke the needle through the bag, pass through the pre-poked strip, carefully thread through the previous loop, secure the loop through gentle pulling (hold onto the end when starting out - it WILL come out!), take the needle BACK through where you just came, and once the new loop is small enough, stick the toothpick through it, and secure the thread by carefully pulling on it.
Of course, my ADD kicked in with the camera.
To anyone working with miniatures, "Use Alone" means "Oh, Look! Now I have Ice!"
Here is that stitch completed.
The second to the last step is to modge podge the top stitching just like the bottom. Then you can trim the extra thread to about 1/4 of an inch from the bag on each ends. If that makes sense. In other words, don't trim it down to the base or it would likely come out.

And there you have it, now you have feed bags for your models horsies!


Saturday, August 29, 2020

Get That Pony!

 Well Anne, I finally found something I could do with that leek. 

When I received my A Field of Dolls guessing game prize, I was at a complete loss as to what to do with a leek that's model horse related. Then with brainstorming at last minute on Jennifer Buxton's Pandemic Performance Panorama (I'll talk about that in another post), I came up with the idea of a perspective photo shoot of a pony plowing through some girls picnic at a horse show with an adult tripping and falling and food is flying everywhere, while the pony is in the foreground with a leek in his mouth! Then I got thinking, "Are leeks safe for horses?" After some research, the answer is no, leeks are toxic for horses. So, the title is going to be: Stop That Pony - Leeks Are Toxic For Equines! OK, so how am I going to make "flying food?" One word: Wire.

I love working with wire. Yeah, working with super thin wire can become tedious, but hey!
A simple circular shape bent to a wonky state placed under a picnic blanket gives it some dramatic action.
And now the frame for the flying objects. It is constructed of another circle with two runways down the center for support to the frame and a pathway to place larger objects/dolls. Then there are about 10 individual wire "strings" that are anchored to the frame with a looped end for holding heavier objects with sticky wax.
It Works!
In the end, these little details would be hidden in the illusion. The wire might still show a little bit, but that's OK for now.
As for the pony, he'll look like this.
Except his sticky wax would probably show since the leek is too heavy for a smaller gob. Maybe, he's frothing at the mouth for holding it too long.

I am hoping to get the last of my Pandemic Performance Panorama entries (this one included) photographed tomorrow. Either that or Monday - I know, right before the deadline! Let's bank on tomorrow, shall we?

I just realized I hadn't mentioned the name of this little pony. It's Carrot Cake. I wanted a typical pony name for him. He's my first SM scale Shetland Pony in my herd. Now I need to find a mate for him, so that I could customize SM Fuzzy Ponies!!! Wouldn't that be awesome?!!!

Friday, August 21, 2020

Performance Props Tutorials: Logs Obstacle


This simple tutorial today is on creating model horse scale Logs obstacle for Trail Competitions.
First thing you need to do is find some very straight sticks that are roughly 1/2" in the diameter. Next, you need to measure the length with your longest walking model in whatever scale you prefer (mine is Wintersong - he really liked this project). Make sure that the pair of sticks are a little bit longer than the model on both ends.
Now, you need to cut the walking-over-logs. The width of the obstacle should be approximately two horses wide. Cut 6 of those and arrange them with even spacing. Make sure that the model's hooves have the right amount of space to move freely as if he were a real horse. Mark on both parallel logs the placing of the width logs with a pencil or marker.
Now you need a file that is round or has a rounded side. You would be using this for getting the indentation started before you use a rotary grinder dremel bit to make them deeper. These indentations are where the width logs are going to sit.


You could do this if you want to, but I wanted to make the raw cuts look like they'd been out in the weather all its life. I used a mixture of grey and earth brown paint, watered down to create a wash.
Careful, the paint gets everywhere. So, make sure that the logs are sitting on something that would protect your table.

And the end results!

(Quite a difference between these two. Wintersong is so gentle and patient, to Speck's Peanut's determined behavior to get to the lady off-camera who is unknowingly holding a bag of his favorite treat: Apples! Speck's Peanut would be up for sale after Labor Day).

(These were among my performance entries for Virtual Breyerfest this year. Neither placed, but it was fun to make!)