

Do you have a model who can't wear a regular halter or bridle due to too much hair on the head or the poll? Well, there's a way around that....it just takes a lot of patience and perseverance. Jennifer Buxton of Braymere Saddlery have made some (you can see them here and here) a few years back, but I hadn't attempted one until now.
Due to the amount of brainstorming, planning, and frustration that goes behind creating one of these halters, I have decided not to make them to sell. They would not be available for commissions, either. But, I did decide to make a tutorial so that you can make one someday.
First things first: Supplies!
Disclaimer: I sewed the pieces to this halter together, because I haven't had any success with gluing them yet (I have a bunch of sale halters that all the glued tabs have popped). So, if you use glue and have success with it, then exchange out the thread for the glue. Also, for leather halters, skip the step for using fray check.

Fray Check for preventing the ribbon from coming undone. You could find this at your local craft store.

1/8" Grosgrain or sturdy Satin ribbon. Grosgrain ribbon is the closest to nylon halters on the visual side. However, finding a variety of colors in that size is quite difficult. This particular brand is from Wal-Mart and they seem to have the most colors. Hobby Lobby also has decorative 1/8" Grosgrain ribbon. I haven't had much luck with Joann's, they mainly have Satin ribbon and rarely Grosgrain in that size. You can use Satin ribbon, though most cannot keep its form through the gluing/sewing process if not sturdy enough.

All-Purpose Thread

26 gauge wire for making "workable" tongue buckles.

A small needle, preferably an embroidery needle. You also need a small awl. This one was found in the beading tools section at Hobby Lobby. The scale is perfect for model horse tack making!

A variety of small pliers, wire cutters, and round nose pliers (these are great for making jump rings that are smaller than what you can buy in the store!)

This is another kind of wire cutter. These are used on separating the hardware from the frame. You will also need some lower grit sandpaper for prepping the hardware pieces.

Embroidery scissors for those who's sewing. Big fabric scissors work fine, too. You would also need either a sewing cutting mat with measurements or a basic ruler.
Measurements:
- Left Cheek: 1"
- Right Cheek: 1/8"
- Buckles: 3/4"
- Left Nose: 1"
- Right Nose: 1/8"
- Left Chin Strap (that connects with the buckle): 1"
- Right Chin Strap: 1/2"
- Pole Strap: 2"
- Throatlatch: 2 1/2"
- Connecting Strap: 3/4"
Tip: Cut the pieces as you go, therefore you won't accidentally attach a piece of ribbon in the wrong area.
Instructions:

1, Cut the left cheek piece and sew/glue it to the slotted ring on one side and a jump ring on the other. (Don't do what I did! The circular part of the slotted ring is supposed to be pointed down to hold the chin strap/buckle!)

2. Cut the right chin strap piece with an angle; this end is extending "into" the forelock. Sew/Glue it onto the circular end of the slotted ring. The other two pieces about 1/8", but eyeballing it is easier when trying to make sure it covers the slots. Sew/Glue those, too. This piece is now finished. It would be held onto the horse completely by three little pieces of wax.

3. Back to the left side of the halter, cut and sew/glue to the according hardware: the nose band to the top slot of the slotted ring, the chin strap buckle piece to the circular part of the slotted ring, and the poll strap buckle piece to the jump ring. (I'm realizing that I did a terrible job taking pictures of the halter with "right" side showing and not the backside like what I did here)
4. Select two buckles and bend them slightly with pliers to give them a "rocking" effect. This makes it easier to thread the poll/chin straps through the buckle.

5. With plier cutters, cut the wire to a length that's a little longer than the buckle. Then use the round nose pliers to create a loop that would...

...attach to the center bar to the buckle. Pinch it close with needle nose pliers.

Then carefully (and patiently)

6. Cut the strap pieces and coat them with fray check. Also, when cutting the pole strap, check it with the model since part of it would be made to look like it's under the mane. Cut that end in the appropriate angle accordingly to the position of the mane.

7. Once the fray check is dry, poke holes in the straps with an awl. For this halter, I didn't use the method of heating up a pin and then "burning" it through to make the holes. This method works pretty well as far as keeping the holes open, whereas the experiment I used this time round did not keep the holes open as well.


8. *Sorry for the blurry image* I found it easiest to situate the tounge in the strap hole before threading the strap through the buckle.

Now, secure the strap to the buckle piece, while hiding the stitching under the buckle.

Do the same for the other buckle piece.

9. Now attach the throat piece.

10. ...And the connector piece. The hardware needed is a D ring and a jump ring. Since the chin strap isn't attached to the other slot ring, the jump ring needs to be sewn in place while using the whipstitch.
And now the halter is ready to try on the model!


This is the general placement of the sticky wax. I could have used smaller amounts here. Don't forget the one at the poll. (The pink glow is from the light reflecting off of my hot pink fuzzy sweatshirt).
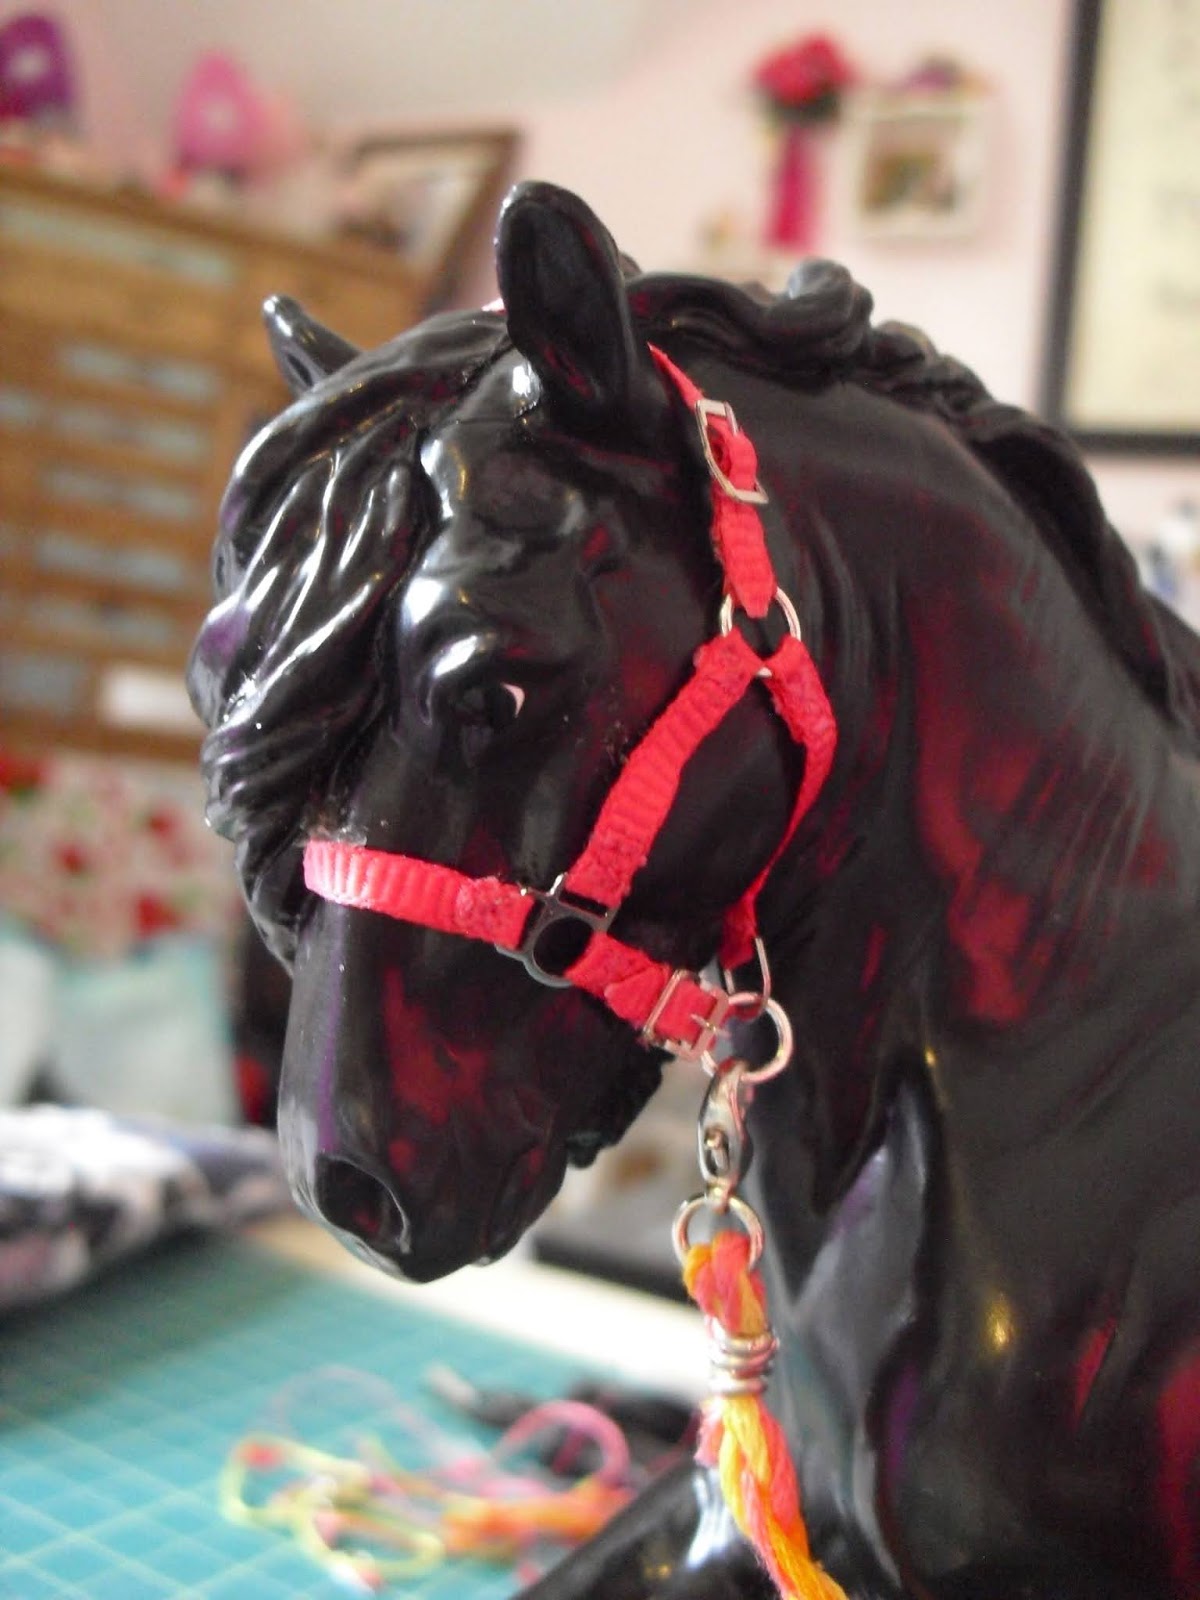
And now the halter...the left side...

...and the right side...

....and the front. (Note: the right slot ring sticks out kind of funny due to not actually being able to fit into the space. But if you can make it fit properly by cutting the actual hardware piece or anyother way you could think of, then awesome, do that!)

As far as storage goes and not loosing the right halter slotted ring piece, attach the lead rope clasp to it so it doesn't get lost.
No comments:
Post a Comment